
Android
How to Find the SSID of a Mobile Hotspot on Android
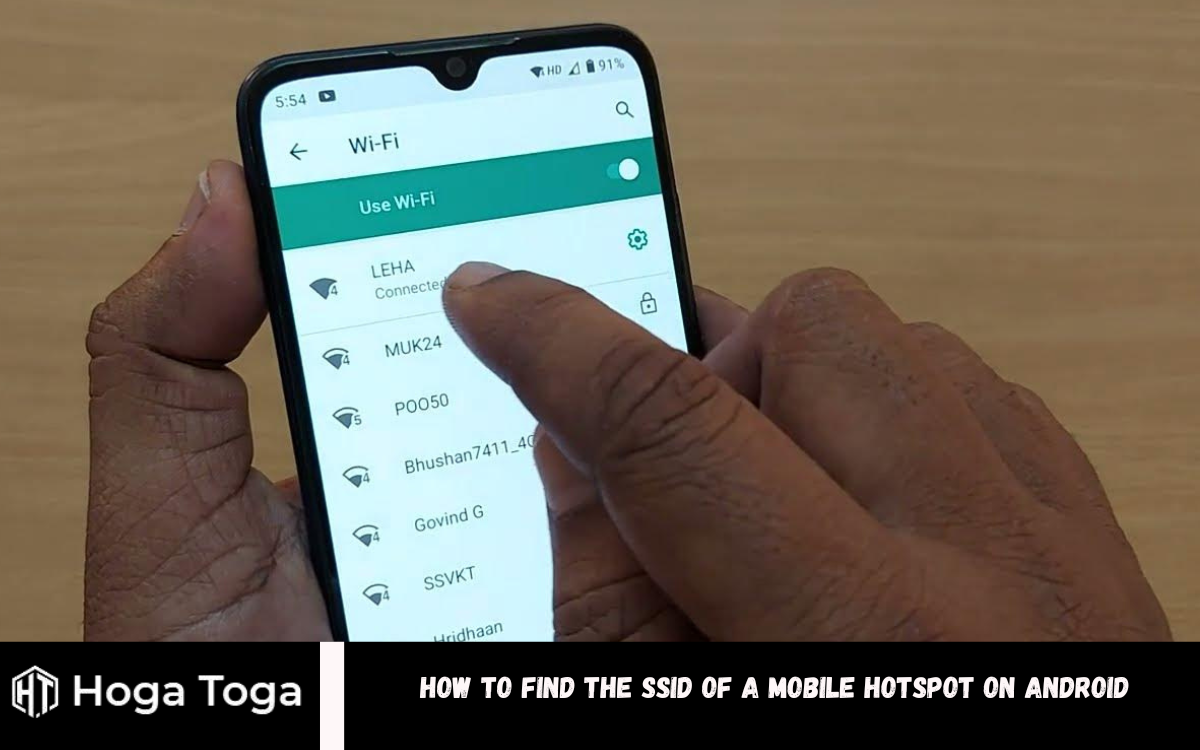
If you’re looking for How to Find the SSID of a Mobile Hotspot on Android, Finding the SSID (Service Set Identifier) of a mobile hotspot on an Android device can be crucial for various purposes, such as connecting other devices or troubleshooting network issues. The SSID is essentially the name of the hotspot network that devices can connect to. While the process may vary slightly depending on the Android version and device model, there are general steps to follow.
Typically, the first step is accessing the settings menu of your Android device. This can be done by swiping down from the top of the screen, tapping on the gear icon, or navigating through the app drawer to find the Settings app.
Within the Settings menu, locate the “Network & Internet” or similar option, where you’ll find settings related to connectivity. Once in the network settings, look for the “Hotspot & tethering” or “Portable hotspot” option. This is where you can manage your mobile hotspot settings.
In the hotspot settings, you should find the option to view the hotspot configuration, which includes the SSID. The SSID is usually displayed prominently, often near the top of the screen, along with other details such as the security type and password. Alternatively, tap the hotspot configuration or edit option to access more detailed information, including the SSID.
What is the SSID of a Mobile Hotspot?
A mobile hotspot’s SSID, or Service Set Identifier, is the name given to the wireless network that the hotspot creates and broadcasts. It’s what you see when you search for available Wi-Fi networks on your device. Think of it as a unique identifier that distinguishes one wireless network from another.
When you enable the mobile hotspot feature on your smartphone or tablet, you turn it into a miniature Wi-Fi router. Other devices, like laptops, tablets, or other smartphones, can connect to this hotspot by selecting its SSID from the list of available networks and entering the necessary password, if applicable.
The SSID is customizable, meaning you can change it to something more recognizable or meaningful. However, by default, it may be set to something generic or device-specific.
How to Find SSID of Mobile Hotspot Android
The SSID is the recognizable name of a Wi-Fi network, visible to users when they scan for available networks on their devices. It distinguishes one wireless network from another and facilitates device connectivity.
To locate the SSID on your Android phone:
- Access the Settings menu on your phone and navigate to the Connections or Network & Internet section. Depending on the manufacturer, these sections may have alternative names, such as Network & Internet or Wireless & Networks.
- Locate options like Mobile Hotspot or Tethering & Portable Hotspot, and tap on it.
Your SSID will typically appear at the top of the screen, labeled as Network Name or SSID.
How to Change the SSID of Your Android Hotspot
Changing the default SSID can bolster security by making it more challenging for potential attackers to identify and target your device for attacks.
Here’s how you can change the SSID of your mobile hotspot on an Android device:
- Open Settings and locate hotspot settings under the Network & Internet section.
- Choose Mobile Hotspot or Tethering & Portable Hotspot settings.
- Once you’re in the hotspot settings, tap on the displayed SSID at the top of the screen.
- Enter a new name for your hotspot and tap Save or a similar option to save the changes.
- Please turn off the hotspot and then turn it back on to apply the updated SSID.
Followed these straightforward steps, you can swiftly change the SSID of your mobile hotspot on Android, enhancing your device’s security. If you have any questions or suggestions, feel free to share them in the comments section. Stay tuned to TechCult for more insightful guides.
Frequently Asked Questions
What is SSID, and why is it important to know?
The SSID (Service Set Identifier) is the name of a Wi-Fi network. It’s crucial to know because it’s how devices identify and connect to a specific network. Knowing the SSID of a mobile hotspot allows users to connect their devices to the hotspot for internet access.
Where can I find the SSID of my mobile hotspot on an Android device?
To locate your mobile hotspot’s SSID, access your Android device’s settings menu, proceed to the network or connection settings, and select the hotspot or tethering option. In this menu, the SSID is typically prominently displayed for easy identification.
Can I change the SSID of my mobile hotspot?
Absolutely, you have the flexibility to personalize the SSID of your mobile hotspot for better recognition. Simply access the hotspot settings on your Android device, find the SSID option, input your desired name, and then save the modifications.
Does changing the SSID of my mobile hotspot affect security?
Modifying the default SSID can bolster security by increasing the complexity for potential attackers trying to identify your device and exploit it. Nonetheless, it’s imperative to complement this measure with robust encryption and password protection to fortify overall security.
Do I need to restart my mobile hotspot after changing the SSID?
In most cases, you’ll need to turn off the hotspot and back it on again for the changes to take effect. This ensures that the hotspot broadcasts the updated SSID to which other devices can connect.
Conclusion
Finding the SSID (Service Set Identifier) of a mobile hotspot on an Android device is a straightforward process that can be essential for various connectivity needs. Users can quickly locate the SSID displayed prominently in the menu by accessing the settings menu, navigating to the network or connection settings, and selecting the hotspot or tethering option. Customizing the SSID empowers users to select a distinctive or personalized name for their hotspot network, thereby bolstering security as it complicates identification for potential attackers. It’s worth noting that altering the SSID might necessitate a restart of the mobile hotspot to enact the modifications fully. This knowledge equips users with the capability to locate and modify the SSID on their Android devices, facilitating the establishment of dependable and secure connections.

If You’re Looking for How to Track Steps on Android, Keeping track of your steps can be essential to maintaining a healthy lifestyle. With the prevalence of smartphones, it’s easier than ever to monitor your daily activity. Android devices offer various built-in and third-party options for tracking your steps, allowing you to stay motivated and accountable in achieving your fitness goals.
One of the simplest ways to track your steps on an Android device is by using the built-in Google Fit app. Google Fit automatically tracks your activity using your device’s sensors, such as the accelerometer. It displays your daily step count, distance traveled, and calories burned in an easy-to-read interface. Google Fit seamlessly integrates with various fitness apps and devices, offering versatility to users who aim to synchronize their data across multiple platforms.
For those looking for more features and customization options, numerous third-party apps are available on the Google Play Store. Apps like Fitbit, Samsung Health, and Strava offer advanced tracking capabilities, social features, and personalized insights to help you reach your fitness goals. Whether you prefer a simple step counter or a comprehensive fitness tracking experience, there’s an Android app out there to suit your needs.
In this guide, we’ll explore how to track your steps on Android using both built-in and third-party apps. This will help you find the solution that works best for you and start taking strides towards a healthier, more active lifestyle.
Ways to Track Steps on Android
Samsung phones come equipped with the Samsung Health app, while many other smartphones offer built-in apps for step tracking. These apps and third-party alternatives provide convenient ways to monitor your daily activity.
Let’s explore some of the most popular and user-friendly options:
Method 1: Using Google Fit
Google Fit is a comprehensive fitness app and an excellent way to track steps on Android. Here’s how to get started:
- Open the Google Fit app and select your Google Account.
- Input your gender, height, weight, and birthday, then tap Next.
- Allow Google Fit to track your activity by tapping the Turn on button.
- Select your goals.
- Upon opening the app, your steps will be displayed at the top of the screen.
Method 2: Using a Step Tracker App
Step Tracker apps utilize your Phone’s accelerometer to detect movement and count your steps. Here are two popular options:
- Fitbit App: Fitbit offers a holistic approach to well-being, including features like workout videos, dietary tracking, hydration monitoring, sleep analysis, and stress management. Here’s how to use it:
- Download the Fitbit app and log in using your Google Account.
- Set up your account and navigate to the Device icon.
- Under Add Connections, select Add Phone, agree to the terms, and allow access. Your step data will now appear in the Fitbit app.
- Step Counter – Pedometer: This app allows you to set personalized goals for steps and calories, earn badges upon reaching milestones, and share achievements. Here’s how to use it:
- Open the Step Counter app and sign in with your Google Account.
- Read and agree to the app policies, then input your age, weight, and gender.
- Set your step goals and save them. The Step Counter app will begin collecting step data from your Phone.
Method 3: Using a Fitness Band
Consider using a fitness band like Fitbit, Samsung Gear, or Xiaomi Mi Band for precise activity tracking. Here’s how to track your steps with one:
- Put on the fitness band, which automatically starts tracking your steps.
- Connect the band with the manufacturer’s fitness app.
- Once connected, the app will display your step count, calories burned, and distance covered.
These methods offer various options to suit your preferences and help you stay motivated on your fitness journey.
Frequently Asked Questions
Which app is best for tracking steps on Android?
Several Android apps are available for tracking steps, with Google Fit being a popular built-in option. Other popular choices include Fitbit, Samsung Health, and Step Counter – Pedometer. The best app for you depends on your preferences for features, user interface, and integration with other devices or platforms.
Do I need a fitness band or wearable device to track steps on Android?
No, you don’t necessarily need a fitness band or wearable device to track steps on Android. Many smartphones have built-in sensors, such as accelerometers, that can accurately track your steps. Apps like Google Fit and Step Counter–Pedometer utilize these sensors to monitor your activity without additional hardware.
How accurate are step-tracking apps on Android?
Step-tracking apps on Android can vary in accuracy depending on factors such as the quality of your Phone’s sensors, the app’s algorithm, and how you carry your Phone throughout the day. While they may not be as precise as dedicated fitness trackers, they generally provide a reliable estimate of your daily step count.
Can I sync step data from my Android device to other platforms or apps?
Many step-tracking apps on Android offer integration with other platforms or apps, allowing you to sync your step data across multiple devices and services. For example, Google Fit can sync data with other fitness apps and devices, while Fitbit allows you to connect with third-party apps for a more comprehensive health and fitness experience.
How can I ensure that my step-tracking app runs accurately in the background?
To guarantee the accuracy of your step-tracking app running in the background, make sure to grant the required permissions for accessing your phone’s sensors and monitoring your activity. Also, review your phone’s battery optimization settings to prevent any restrictions or optimizations that might impact the app’s performance.
Conclusion
Tracking steps on Android offers convenient access to monitoring and managing your physical activity. Whether you prefer using built-in apps like Google Fit or third-party solutions like Fitbit or Samsung Health, there’s a method suited to every preference and lifestyle.
You can precisely monitor your daily steps using just your Android device’s built-in sensors, eliminating the need for extra hardware. These apps accurately count your steps and offer valuable insights into your overall activity, serving as a motivating force and holding you accountable for reaching your fitness objectives.

You’re not alone if you’re Looking for How to Change Read-Only Contacts on Android. This common issue can be incredibly annoying when you urgently need to update vital information. However, there’s good news: there are multiple methods you can explore to change read-only contacts on your Android device, restoring your ability to manage your contact list with ease and regain complete control.
A direct method ensures you possess the requisite permissions to edit contacts on your device. This might entail tweaking settings within your contacts app or authorizing the app to modify contacts. Additionally, consider exporting the contact to your Google account and effecting changes through the Google Contacts web interface, which frequently boasts enhanced editing capabilities.
Alternatively, you can explore third-party contact apps from the Google Play Store. These apps often provide supplementary features and customization options beyond what the default contacts app offers. In some instances, they can circumvent restrictions impeding edits to contacts in read-only mode. By leveraging these alternative apps, you can overcome limitations and efficiently manage your contact list according to your preferences.
In this guide, we’ll explore these methods in detail, providing step-by-step instructions to help you regain control over your contacts and ensure they’re always up to date. Whether managing personal or professional contacts, knowing how to change read-only contacts on Android can save you time and frustration in the long run. Let’s dive in and explore your options!
How to Change Read-Only Contacts on Android
Encountering read-only contacts on your Android device can be frustrating, as they restrict you from directly modifying the contact details. These contacts are often imported from various sources like your Google account or other linked accounts, allowing you to view their information but not alter it. However, there are effective methods to manage them.
Method 1: Unlink the Contact To modify a read-only contact, the initial step involves unlinking it. Follow these steps:
- Open the Contacts app and locate the read-only contact you intend to change.
- Tap the three dots icon for additional options.
- Select “View Linked Contacts” from the menu and proceed to tap “Unlink.”
- After unlinking, locate the same contact and delete it.
- Save the contact again as a new entry.
Method 2: Utilize the Google Contacts App. Google Contacts offers a convenient feature for merging contacts, simplifying the management process. Here’s how:
- Install Google Contacts and log in with your Google account.
- Navigate to the read-only contact within the app.
- Tap the hamburger icon and select “Delete” from the menu.
- Confirm by tapping “Move to Bin” in the prompt.
- Resave the contact to complete the process.
Method 3: Edit at the Source App For contacts originating from platforms like WhatsApp or Facebook, editing them directly within the respective apps is efficient. Follow these steps for WhatsApp:
- Open WhatsApp and access a chat with the contact you wish to edit.
- Tap on the name of the contact displayed at the top of the chat screen.
- Select “Edit” or the pencil icon.
- Update the contact’s details.
- Save the changes.
Following these methods, you can effectively manage read-only contacts on your Android device, ensuring seamless communication.
Frequently Asked Questions
Why are some contacts read-only on my Android device?
Read-only contacts are typically synced from external sources like your Google account or other linked accounts. These contacts are locked to prevent accidental changes or to maintain consistency with the source data.
How can I tell if a contact is read-only?
You can identify read-only contacts in your Android device’s contacts app by their inability to be edited directly. While you can view their details, such as name, phone number, and email address, you won’t find options to modify or delete them.
Can I change read-only contacts on my Android device?
You can change read-only contacts on your Android device using various methods. These may include unlinking and resaving the contact, using the Google Contacts app to merge or delete contacts, or editing them directly within the source app (e.g., WhatsApp, Facebook).
What should I do if I can’t edit a contact on my Android device?
If you encounter difficulties editing a contact, ensure you have the necessary permissions to modify contacts on your device. Additionally, try the abovementioned methods, such as unlinking the contact or using third-party contacts apps for more flexibility.
Will changing a read-only contact affect the source data?
Changing a read-only contact on your Android device typically does not affect the source data. However, it’s essential to double-check to ensure that any modifications you make are synced back to the source accurately, especially if the contact is linked to your Google account or other accounts.
Conclusion
While encountering read-only contacts on your Android device may initially seem like an obstacle, effective solutions are available to manage and modify them. You can regain control over your contact list by utilizing methods such as unlinking and resaving contacts, using the Google Contacts app to merge or delete contacts, or editing them directly within the source app.
It’s essential to ensure that you have the necessary permissions to modify contacts on your device and to verify that any changes made are accurately synced back to the source data. With these strategies in place, you can efficiently handle read-only contacts and ensure that your contact list remains up-to-date and accessible for seamless communication.

If you’re looking for Fix Audible Keeps Pausing When Screen is Locked on Android, Audible, the popular audiobook platform, offers a seamless listening experience to millions of users worldwide. However, some Android users may encounter an issue where their Audible app pauses playback when the screen locks. This inconvenience interrupts the immersive listening experience and frustrates users. Fortunately, you can take several troubleshooting steps to resolve this issue and enjoy uninterrupted audiobook enjoyment on your Android device.
In this comprehensive guide, we’ll delve into the reasons behind Audible pausing when the screen is locked on Android and provide step-by-step solutions to fix it. Whether it’s a settings tweak, app update, or device optimization, we’ll cover all the possible avenues to ensure you can listen to your favorite books without interruption.
Firstly, we’ll explore why this problem occurs. Understanding the underlying causes can help pinpoint the most effective solution. From there, we’ll walk you through a series of troubleshooting steps, starting with simple adjustments to the Audible app settings and progressing to more advanced methods such as system updates and battery optimization.
By the end of this guide, you’ll understand how to resolve the issue of Audible pausing on Android when the screen locks. Whether you’re an avid listener or a casual audiobook enthusiast, these solutions will help you enjoy your favorite titles without interruption. Let’s dive in and troubleshoot together to ensure a seamless listening experience on your Android device.
Why Does Audible Pause When the Screen Locks?
Audible pausing when the screen locks on Android can be attributed to several factors. One primary reason is your Android device’s power-saving features or battery optimization settings. When the screen locks, Android may prioritize conserving battery by suspending background processes, including audio playback from apps like Audible. Additionally, specific system settings or third-party apps may interfere with Audible’s ability to play when the screen is locked. These settings or apps might override Audible’s audio focus, causing it to pause unexpectedly.
Moreover, outdated versions of the Audible app or Android operating system can also contribute to this issue, as they may need to be fully compatible. Understanding these underlying causes is crucial for implementing practical solutions to prevent Audible from pausing when the screen locks on your Android device.
Fix Audible Keeps Pausing When Screen is Locked
If Audible pauses when your Android screen locks are causing frustration, multiple troubleshooting methods are available to help resolve the issue.
Method 1: Enable “Turn off auto-lock.” You can enable the “Turn off auto-lock” feature within the Audible app settings to prevent Audible from pausing when the screen locks. Here’s how:
- Launch the Audible app and tap your profile icon.
- Choose the gear icon to enter settings, then tap “Player.” Activate the “Turn off auto-lock” option.
Method 2: Check Battery Optimization Settings Android’s battery optimization feature may interfere with Audible playback. To adjust these settings:
- Open your device’s Settings and go to “Battery.”
- Tap on “More battery settings,” then select “Optimize battery use.”
- Locate Audible in the list and choose “Don’t optimize.”
Method 3: Grant Audible Background Permissions Ensure Audible has permission to run in the background:
- Open Settings and navigate to “Apps Management.”
- Find and tap on the Audible app.
- Tap on “Battery usage,” then turn on “Allow background activity.”
Method 4: Force Stop and Clear Audible Cache Clearing Audible’s cache and force-stopping the app can resolve potential issues:
- Go to Settings > App Management.
- Find Audible in the app list and tap on it.
- Tap “Force Stop” to halt the app’s processes.
- Next, tap on “Storage usage” and select “Clear cache.”
Method 5: Update Audible and Your Android OS. Ensure both Audible and your Android operating system are up to date:
- Open the Google Play Store and search for Audible.
- If an update is available, tap “Update.”
- Go to Settings > System > Advanced > System update to check for Android updates.
Method 6: Re-Download Audible Books Corrupted audiobook files may cause playback issues. Re-download them to resolve the problem:
- Open Audible and go to your Library.
- Select the menu icon adjacent to the title you wish to re-download.
- Select “Remove from device,” then re-download the book.
Method 7: Reinstall the Audible App. If all else fails, reinstalling the Audible app can provide a fresh start:
- Open the Google Play Store and search for Audible.
- Tap “Uninstall” to remove the app altogether.
- Restart your device, then reinstall Audible from the Play Store.
By following these troubleshooting methods, you can resolve the issue of Audible pausing when the screen locks on your Android device and enjoy uninterrupted audiobook listening.
Frequently Asked Questions
Why does Audible keep pausing when my Android screen locks?
Audible may pause when the screen locks for various reasons, such as battery optimization settings, background activity restrictions, or outdated software versions. Android’s power-saving features often prioritize suspending background processes, including audio playback, to conserve battery life.
How can I prevent Audible from pausing when my Android screen locks?
Consider activating the “Turn off auto-lock” feature in the Audible app settings to mitigate Audible pausing when the Android screen locks. Furthermore, fine-tune battery optimization settings, authorize Audible for background activity, and verify that both the Audible app and Android OS are current.
What should I do if enabling “Turn off auto-lock” doesn’t work?
If enabling “Turn off auto-lock” doesn’t resolve the issue, you can try other troubleshooting methods such as adjusting battery optimization settings, granting Audible background permissions, force-stopping and clearing Audible’s cache, or reinstalling the Audible app.
Will updating Audible and my Android OS fix the issue?
Updating Audible and your Android operating system can fix compatibility issues that may cause Audible to pause when the screen locks. It’s recommended to regularly check for updates for both the Audible app and your Android OS to ensure optimal performance.
Why does Audible only pause when my Android screen locks and not with other apps?
Audible pausing when the screen locks on Android may be specific to how the app interacts with the device’s power-saving features and background activity restrictions. Other apps may exhibit different behavior due to differences in their programming and how they handle background processes. Resolving the issue may require specific adjustments tailored to the Audible app’s settings and permissions.
Conclusion
Troubleshooting the issue of Audible pausing when the screen is locked on Android involves a series of steps to address various potential causes. By understanding the reasons behind this problem and implementing the appropriate solutions, users can enjoy uninterrupted audiobook listening experiences on their Android devices.
Enabling features like “Turn off auto-lock” within the Audible app settings can help prevent interruptions caused by screen locking. Adjusting battery optimization settings, granting background permissions to Audible, and ensuring the Audible app and the Android operating system are up to date are essential steps in resolving the issue.

How to Spot Loose Slot Machines: Tips for Finding Better Payouts
Bola Slot – Complete Educational Guide to Sports Betting and Slot Games
Slot Gacor: The Future of Slot Machines in the Gambling World

Why Businesses Are Choosing Digital Marketing Agency Asia for Superior SEO Services

Why Corteiz Tracksuits Are Everyday Staples for Me

The Syna World Fits Everyone Wants in 2025

Bridging the Gap How Technology is Transforming Student-Teacher Interactions

How to Set Certain Contacts to Ring on Silent on Android

How to Recover Contacts on Android Phone

New Update In Free Fire Game

How to Change Read-Only Contacts on Android

Free Fire Game New Tips and Tricks

How to Disable Android Automatic Updates

How to Get Contacts From iCloud to Android Phone
-
 How To2 years ago
How to Set Certain Contacts to Ring on Silent on Android
-
 How To2 years ago
How to Recover Contacts on Android Phone
-
 Tips And Trick2 years ago
New Update In Free Fire Game
-
 Android2 years ago
How to Change Read-Only Contacts on Android
-
 Tips And Trick2 years ago
Free Fire Game New Tips and Tricks
-
 How To2 years ago
How to Disable Android Automatic Updates
-
 Android2 years ago
How to Get Contacts From iCloud to Android Phone
-

 How To2 years ago
How to Uninstall Software Update On Android