How To
How to Enable USB Debugging on Android Devices
Suppose You’re looking for How to Enable USB Debugging on Android Devices. In that case, Enabling USB debugging on Android devices is a crucial step for developers, enthusiasts, and even regular users who seek advanced control over their smartphones or tablets. USB debugging facilitates a direct connection between your Android device and a computer, enabling various development and debugging tasks, such as installing custom ROMs, debugging apps, and accessing advanced developer tools.
Accessing the Developer Options menu on your Android device is usually necessary to enable USB debugging. This menu is initially concealed to prevent inadvertent modifications to vital settings. However, you can reveal it effortlessly by tapping the Build Number located in the About Phone section of your device’s settings repeatedly (typically around seven times) until a confirmation message appears, indicating that Developer Options have been successfully enabled.
Once Developer Options are accessible, you can navigate to the menu and toggle the USB debugging option. Upon connecting your Android device to a computer via a USB cable, you’ll be prompted to authorize the connection, granting the computer permission to access debugging features.
Enabling USB debugging empowers users with enhanced control and customization options for their Android devices, making it an essential skill for anyone looking to explore the full potential of their smartphone or tablet.
What is USB Debugging?
USB debugging is a feature in Android devices that allows communication between a device and a computer via a USB connection. Developers and advanced users primarily use it to facilitate various tasks related to app development, debugging, and system modifications.
Enabling USB debugging on an Android device enables the computer to recognize the device as a debugging target. This capability empowers developers to seamlessly transfer data between the device and the computer, install and debug apps directly on the device, and utilize advanced debugging tools offered by the Android SDK (Software Development Kit).
How to Enable Developer Options on Android
Enabling USB debugging on your Android device involves a few steps, starting with unlocking the Developer options menu.
For Android 4.2 and newer:

Step 1: Unlock Developer options
- Open the Settings app and scroll down to the bottom. Tap on “About phone.”
- Find the “Build number” entry and tap it seven times in quick succession.
- You’ll receive a notification stating, “You are now a developer!”.
Step 2: Enable Developer options
- Go back to the main Settings menu.
- Tap “System” or “Additional settings,” depending on your device.
- Look for and tap on “Developer options.”
- Toggle the switch at the top of the screen if Developer options are not enabled.
For Android 4.1 and older:
- Open Settings and locate “Developer options” in the main menu. If you don’t see it, proceed to the next step.
- Tap on “About phone” and then tap on “Build number” seven times in quick succession.
- Once Developer options are unlocked, you’ll find it listed in the main Settings menu.
Once Developer options are enabled, you can enable USB debugging by toggling the corresponding option within the Developer options menu. This allows your Android device to communicate with a computer via USB for debugging purposes, granting access to various development and debugging tools.
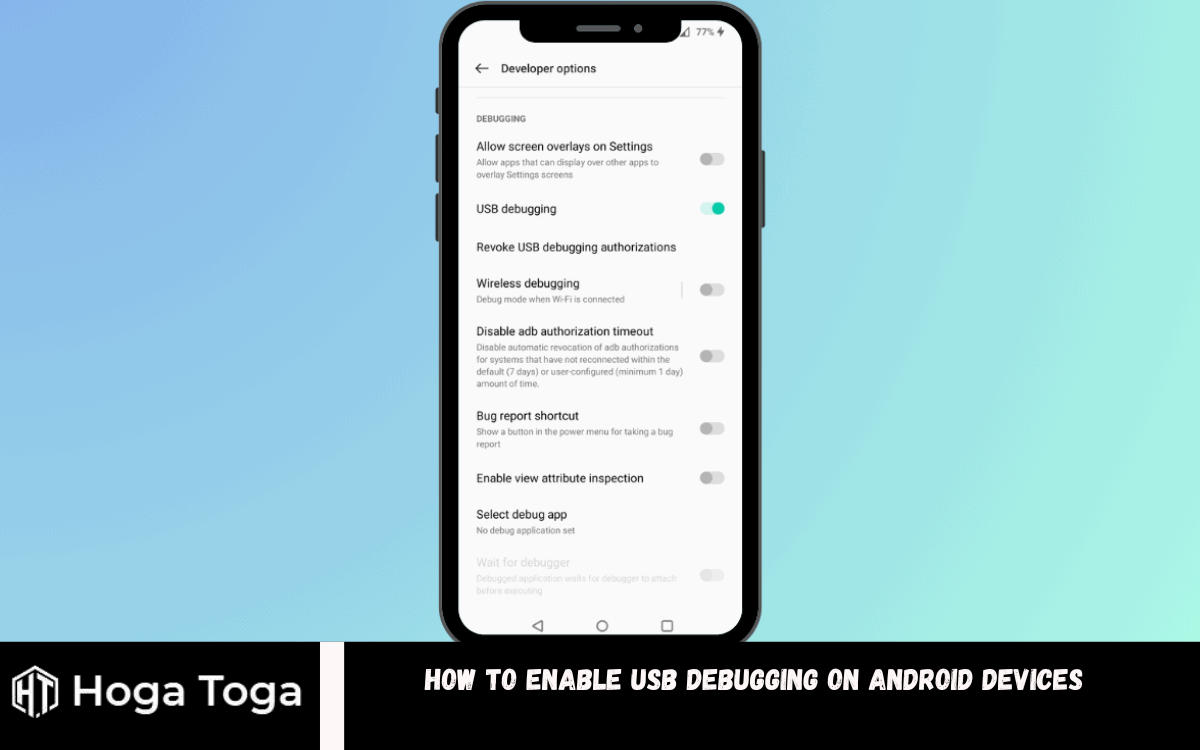
How to Enable USB Debugging on Android
Once you’ve accessed the Developer options menu, enabling USB debugging is straightforward:
- Open the Developer options menu from your device’s Settings.
- Go down until you find the “USB debugging” option.
- Tap the slider next to “USB debugging” to enable it.
- You may receive a prompt explaining that USB debugging is intended for development purposes and could allow a computer to access private data on your device. Carefully read the details provided, and if you understand and accept the risks, tap “OK” to proceed.
Enabling USB debugging allows your device to communicate with a computer via USB for debugging and development purposes, unlocking a range of advanced features and functionalities.
How to Authorize USB Debugging Access
When you first connect your Android device to a new computer with USB debugging enabled, you’ll be prompted to grant the computer permission to use USB debugging. This permission is crucial for establishing communication between the device and the computer via ADB (Android Debug Bridge).
When you connect your Android device, a dialog box titled “Allow USB debugging?” should appear on your device’s screen. You’ll have the option to choose “OK” or “Cancel.” To avoid being asked again in the future, you can check the box next to “Always allow from this computer.”
If you don’t see this message, try unplugging your device and reconnecting it while the screen is unlocked. Additionally, ensure that your device’s screen is not locked during the connection process. If you encounter issues, you can reset the list of computers authorized to use USB debugging by navigating to Developer options and selecting “Revoke USB debugging authorizations.”
Once you’ve given your computer permission to utilize USB debugging, you’re ready to proceed! Now, you can seamlessly connect your phone to the computer using a USB cable and access ADB and other associated tools without encountering any additional interruptions.
Frequently Asked Questions
What is USB debugging, and why should I enable it?
USB debugging serves as a pivotal feature enabling direct communication between your Android device and a computer via USB. This functionality empowers users, particularly developers and advanced enthusiasts, by facilitating a spectrum of development and debugging tasks.
How do I enable USB debugging on my Android device?
You must unlock the Developer options menu in your device’s settings to enable USB debugging. This involves tapping the “Build number” entry multiple times in the “About phone” section. Once Developer options are unlocked, you can navigate to the menu, find the “USB debugging” option, and toggle it on.
Is it safe to enable USB debugging?
Enabling USB debugging is generally safe, but it’s essential to understand the potential risks. USB debugging grants elevated access to your device’s system, which could be exploited if connected to an untrusted computer. However, the risks are minimal as long as you’re cautious about granting permission to new computers and only connecting to trusted devices.
Why do I not see the prompt for USB debugging when I connect my device to a computer?
If you do not see the prompt to allow USB debugging, it could be due to various reasons, such as a locked screen, disabled Developer options, or issues with the USB connection. Ensure that your device’s screen is unlocked and developer options are enabled, and try reconnecting the device while the screen is on.
Can I revoke USB debugging authorizations?
To reset the list of computers permitted to access your device via USB debugging, you can revoke USB debugging authorizations directly from the Developer options menu on your Android device.
Conclusion
Enabling USB debugging on Android devices is pivotal for developers, enthusiasts, and users seeking advanced control over their devices. This feature facilitates direct communication between the device and a computer via USB, unlocking a plethora of development and debugging capabilities.
To enable USB debugging, users typically need to unlock the Developer options menu by tapping the “Build number” entry multiple times in the device’s settings. Once Developer options are accessible, users can navigate the menu, find the “USB debugging” option, and toggle it on.


When you’re shopping for a bed frame, there are several factors to consider. The bed frame is not just a place to hold your mattress; it’s also the focal point of your bedroom decor. Therefore, choosing the right one can greatly affect the overall look and feel of your room.
Firstly, consider the size of your mattress and room. Bed frames come in various sizes, including twin, full, queen, king and California king. It’s essential that you choose a frame that fits both your mattress and bedroom perfectly. A too-large bed frame will make your room seem cramped while one that’s too small may not provide adequate support for your mattress.
Material is another crucial factor when choosing a bed frames are typically made from metal or wood with each material offering its own advantages and disadvantages. Metal frames tend to be more durable and less expensive than wooden ones but they may not offer as much aesthetic appeal. Wooden frames on the other hand often have more intricate designs but can be prone to damage over time if not properly cared for.
The design style of the bed frame should also be considered when making a purchase decision. There are many styles available ranging from traditional to modern so you’ll want to choose something that complements the rest of your furniture and decor.
Consider whether you need any additional features such as under-bed storage or an adjustable base which allows you to raise or lower different parts of the bed for added comfort.
Price is another important consideration when buying a new bed frame as prices can vary widely depending on factors like size, material type, brand name etc., so it’s important to set budget before start shopping around.
Furthermore, check out customer reviews before purchasing any particular model because these can provide valuable insight into potential issues others have faced with product durability or assembly process etc.
Lastly but most importantly don’t forget about warranty coverage because this protects against defects in materials workmanship which could save money long term if something goes wrong.
In conclusion, buying a bed frame requires careful consideration of several factors including size, material, style, price and additional features. By taking the time to consider these elements before you shop, you can ensure that you choose a bed frame that not only fits your mattress and complements your bedroom decor but also provides the level of comfort and durability you need. Happy shopping!
How To
Photorealistic 3D Automotive Modeling: How Studios Use Blender and Unreal Engine for Cinematic Visuals

In the fast-changing world of car design, making realistic car models has become more advanced than ever. As technology keeps evolving, car studios are using powerful 3D design tools like Blender and Unreal Engine to create amazing visual displays. This shift highlights the growing importance of 3D Automotive Modeling, which plays a crucial role in both the design and visualization of vehicles. These tools are changing how cars are promoted and developed, even impacting the way new products are launched. This article looks at the detailed process of creating realistic 3D car models and the methods and technologies involved in this exciting field.
Key Takeaways
- Innovative Technology: The combination of Blender and Unreal Engine is revolutionizing automotive design, leading to more realistic and engaging visualizations.
- Enhanced Interactivity: VR and real-time rendering capabilities allow for interactive experiences, boosting customer engagement and interest in new vehicle models.
- Streamlined Processes: The integration of these tools streamlines the workflow, helping designers focus on creativity and innovation while optimizing productivity.
- Market Influence: Photorealistic 3D models significantly impact marketing strategies, creating buzz and facilitating informed consumer decisions before product launches.
- Future of Automotive Design: As technology evolves, the possibilities for automotive visualization will expand, promising even more revolutionary changes in design and marketing approaches.
The Evolution of 3D Car Design
The journey of 3D car design has been a fascinating evolution, paralleling advancements in digital technology. From the rudimentary beginnings to today’s sophisticated techniques, the transformation has been remarkable.
From CAD to Photorealism
The initial computer-aided design (CAD) systems laid the critical groundwork for today’s advanced modeling techniques. These early systems were revolutionary in their ability to assist designers in creating basic car models. However, it was the introduction of photorealistic rendering that truly changed the landscape, enabling designers to produce lifelike representations that could be mistaken for photographs.
Breakthroughs in Digital Visualization
The leap from basic CAD models to photorealistic 3D renderings has been marked by significant technological breakthroughs. Enhanced computing power and advanced software algorithms have facilitated the creation of highly detailed models. These innovations have allowed designers to capture intricate details, from the reflection of light on a car’s surface to the texture of its interior materials.
The Role of Virtual Reality
Virtual reality (VR) has emerged as a game-changer in automotive visualization, offering an immersive experience that goes beyond traditional models. Through VR, designers and consumers alike can explore car models in a fully interactive environment. This advancement not only aids in the design process but also enhances marketing efforts by providing potential buyers a realistic preview of the vehicle.
Leveraging Blender for 3D Car Modeling
Blender, a powerful open-source 3D modeling software, has become a favorite among automotive studios for its versatility and cost-effectiveness. Its robust feature set allows designers to create highly detailed car models with realistic textures and lighting.
Mesh Modeling Capabilities
Blender offers advanced mesh modeling tools that are essential for replicating the complex geometries of car designs. Designers can meticulously craft the contours and shapes of a vehicle, ensuring that every curve and line is accurately depicted. This precision is crucial for achieving a photorealistic look that captures the essence of real-world automobiles.
Material and Texture Editing
With Blender’s sophisticated material editor, designers can simulate various surface finishes, from glossy paints to matte textures. This capability enhances the realism of the model, allowing it to reflect light and shadow in a way that mimics real-life materials. The ability to edit textures in fine detail is vital for creating surfaces that are visually convincing.
Real-time Rendering and Feedback
The integration of real-time rendering capabilities in Blender provides immediate visual feedback, enabling designers to iterate quickly and refine their models with ease. This feature is particularly beneficial during the design process, as it allows for the exploration of different lighting conditions and environments, ensuring the model looks authentic in every scenario.
Unreal Engine: Elevating Renders to Cinematic Quality
Unreal Engine, renowned for its prowess in game development, has found a unique application in automotive visualization. Its real-time rendering capabilities and photorealistic graphics make it an ideal tool for creating cinematic-quality car renders.
High-Fidelity Graphics and Detailing
Unreal Engine’s advanced rendering pipeline produces high-fidelity graphics that are nearly indistinguishable from real-life photographs. The engine’s ability to render minute details with precision adds an unparalleled level of realism to car models. This capability is essential for showcasing the finer aspects of a vehicle’s design, such as the texture of its seats or the gleam of its paint.
Dynamic Lighting and Shadow Effects
The engine’s ability to simulate dynamic lighting and shadows adds depth and realism to car models. This feature enhances the visual appeal of the renders by providing a more lifelike depiction of how light interacts with the vehicle. The realistic play of light and shadow is crucial for creating a sense of depth and dimension in the rendered images.
Creating Interactive Experiences
Unreal Engine allows for the creation of interactive experiences, where potential buyers can explore cars in a virtual environment. This interactive capability offers a unique and engaging marketing tool, allowing users to interact with the vehicle as if they were physically present. Such experiences can significantly enhance customer engagement and interest.
The Integration of Blender and Unreal Engine
The combination of Blender and Unreal Engine provides automotive studios with a powerful toolkit for creating photorealistic car models. Blender is often used for modeling and texturing, while Unreal Engine takes on the role of rendering and creating interactive experiences.
Streamlined Workflow for Enhanced Productivity
The synergy between Blender and Unreal Engine allows for a streamlined workflow that maximizes the strengths of each software. Designers can efficiently transition from modeling in Blender to rendering in Unreal Engine, minimizing the time and effort required to produce high-quality visuals. This seamless integration enhances productivity and allows for greater focus on creativity and innovation.
Modeling and Texturing in Blender
Designers begin by modeling the car in Blender, focusing on capturing every detail, from the contours of the body to the intricacies of the interior. This stage is crucial for laying the foundation of a realistic model. Once the model is complete, materials and textures are applied to simulate real-world surfaces, ensuring that the model reflects light and shadow accurately.
Dynamic Environments and Real-time Rendering in Unreal Engine
After the model is imported into Unreal Engine, it is rendered using the engine’s powerful graphics capabilities. Here, designers can create dynamic environments that enhance the realism of the model. The ability to render in real-time allows for interactive experiences, providing users with an immersive view of the car in various settings.
Applications in Marketing and Prototyping
The use of photorealistic 3D car models extends beyond design and visualization; it plays a crucial role in marketing and prototyping. Automotive companies can showcase new models in virtual showrooms, allowing potential buyers to explore every angle of a vehicle before it hits the production line.
Virtual Showrooms for Enhanced Customer Engagement
Virtual showrooms provide an innovative platform for automotive companies to showcase their latest models. These digital spaces allow potential buyers to interact with vehicles in a realistic setting, offering a comprehensive view of the car’s features. This approach not only enhances customer engagement but also provides valuable insights into consumer preferences.
Testing Aerodynamics and Performance Metrics
Photorealistic 3D models are invaluable tools for testing aerodynamics and other performance metrics during the prototyping phase. Designers can use these models to simulate real-world conditions, gaining insights into the vehicle’s performance before it is physically built. This capability allows for adjustments to be made early in the design process, optimizing the final product.
Streamlining Product Development and Launches
The integration of 3D modeling in the product development process streamlines the journey from concept to launch. Companies can unveil new models in virtual environments, reaching a global audience without the logistical challenges of a physical event. This approach not only saves time and resources but also creates a buzz in the market, driving interest and engagement.
Conclusion
The integration of Blender and Unreal Engine in automotive studios marks a significant shift in how cars are designed, visualized, and marketed. The ability to create photorealistic 3D models has opened new avenues for innovation, enabling designers to push the boundaries of creativity and precision. As technology continues to evolve, the future of automotive visualization promises even more exciting developments, with cinematic renders leading the charge in redefining the automotive industry. The continued advancement of these tools will undoubtedly usher in a new era of automotive design, where virtual and reality seamlessly converge.
Frequently Asked Questions: 3D Automotive Modeling and Visualization
1. What are the primary software tools used in 3D automotive modeling?
The primary tools include Blender for modeling and texturing, and Unreal Engine for rendering and creating interactive experiences.
2. How does virtual reality enhance automotive visualization?
Virtual reality (VR) provides an immersive experience, allowing users to explore and interact with 3D car models in a virtual environment. This enhances both the design process and marketing presentations, making them more engaging and insightful.
3. What advantages does photorealistic 3D modeling offer in automotive design?
Photorealistic 3D modeling allows designers to create lifelike representations of vehicles. This improves visualization accuracy, aids marketing by offering realistic previews, and supports design validation and testing before physical production.
4. Can 3D models be used for marketing purposes?
Yes, 3D models are widely used in virtual showrooms, product configurators, and online marketing campaigns. They enable potential buyers to interact with vehicles in detail, even before the cars are officially released.
5. How do Blender and Unreal Engine work together in automotive studios?
Blender is typically used for the initial modeling and texturing of car designs. Once the models are complete, they are imported into Unreal Engine to produce high-quality renders and create dynamic, interactive experiences for presentations or virtual reality applications.

If you’re looking for How to Set Certain Contacts to Ring on Silent on Android, Managing contacts on Android devices is essential for maintaining productivity and ensuring you’re accessible to the right people at the right times. One particularly useful feature is setting specific contacts to ring even when your device is in silent mode. This functionality can be a lifesaver in situations where you need to prioritize communication from certain individuals without being disturbed by others.
To achieve this on an Android device, you typically utilize the “Do Not Disturb” (DND) settings, which allow for the customization of notifications based on various criteria. By specifying certain contacts as exceptions to the silent mode, you ensure that calls and messages from those individuals will still come through audibly, even when your phone is muted.
The process may vary slightly depending on your device’s manufacturer and Android version, but generally, it involves accessing the DND settings, selecting “Allow Exceptions” or similar, and then choosing the option to allow calls and messages from specific contacts. Once configured, your phone will ring or notify you of calls and messages from those designated contacts, even if you’ve silenced other notifications.
How to Set Certain Contacts to Ring on Silent on Android
Setting certain contacts to ring on silent mode on your Android device offers a tailored approach to managing your notifications, ensuring you stay connected with priority individuals while maintaining focus. Here are three methods to achieve this:
Method 1: Star Important Contacts

The simplest way built into Android is to star contacts. Follow these steps:
- Open the Contacts app on your device.
- Locate the contact you want to prioritize.
- Tap their name to access contact details.
- Tap the Star icon to mark them as a priority contact.
- In your device’s Settings, navigate to Sound & vibration > Do Not Disturb.
- Under Calls, select Allow Calls and choose Starred contacts only.
Now, calls from starred contacts will bypass silent mode, ensuring you’re reachable when needed.
Method 2: Customize Do Not Disturb Settings
For more granular control:
- Go to Settings > Sound & vibration > Do Not Disturb.
- Tap Allow exceptions and select Calls.
- Choose from options like Anyone, Contacts Only, or Starred Contacts Only.
- Further, customize by selecting Favorite Contacts or creating a custom group in the Contacts app.
- Adjust settings for Messages, Events & Reminders, and App messages as desired.
These settings give you precise control over who and what can interrupt you during silent mode.
Method 3: Use a Third-Party App
For advanced customization, consider third-party apps like Call Control or CallApp:
- Install your chosen app from the Google Play Store.
- Grant necessary permissions and set up the app.
- Follow the app’s instructions to add contacts to your allowed list or favorites.
- Enable the feature within the app’s settings to ensure calls from selected contacts ring through even during silent mode.
These apps provide additional flexibility and features to tailor your notification preferences to your needs.
Frequently Asked Questions
Can I Set Specific Contacts to Ring on Silent Mode on Android?
Yes, you can. Android provides various methods to prioritize calls and notifications from specific contacts even when your phone is in silent mode. These methods include starring contacts, customizing Do Not Disturb settings, and using third-party apps.
How Do I Star Important Contacts on Android?
To start important contacts on Android:
- Open the Contacts app.
- Find the contact you want to prioritize.
- Tap on their name to view their details.
- Tap the Star icon to mark them as a priority contact.
Can I Customize Do Not Disturb Settings to Allow Calls from Certain Contacts?
Absolutely. Android’s Do Not Disturb settings allow for customization to permit calls from specific contacts. You can choose to allow calls from anyone, contacts only, starred contacts only, or create a custom list of favorite contacts.
Are There Third-Party Apps Available to Enhance Control Over Silent Mode?
Yes, several third-party apps on the Google Play Store offer advanced features for managing silent mode and prioritizing contacts. Apps like Call Control and CallApp provide additional customization options beyond what’s available in the default Android settings.
Will Setting Contacts to Ring on Silent Mode Override Other Notification Settings?
Yes, setting specific contacts to ring on the silent mode will override the general silent mode settings for calls from those contacts. However, other notification settings such as alarms, messages, and app notifications may still be affected by silent mode unless specifically configured otherwise.
Conclusion
Setting certain contacts to ring on silent mode on Android devices offers a personalized approach to managing notifications and ensuring accessibility while maintaining focus. By prioritizing calls from specific individuals, users can stay connected with important contacts without being disrupted by non-urgent notifications.

How to Spot Loose Slot Machines: Tips for Finding Better Payouts
Bola Slot – Complete Educational Guide to Sports Betting and Slot Games
Slot Gacor: The Future of Slot Machines in the Gambling World

Why Businesses Are Choosing Digital Marketing Agency Asia for Superior SEO Services

Why Corteiz Tracksuits Are Everyday Staples for Me

The Syna World Fits Everyone Wants in 2025

Bridging the Gap How Technology is Transforming Student-Teacher Interactions

How to Set Certain Contacts to Ring on Silent on Android

How to Recover Contacts on Android Phone

New Update In Free Fire Game

How to Change Read-Only Contacts on Android

Free Fire Game New Tips and Tricks

How to Disable Android Automatic Updates

How to Get Contacts From iCloud to Android Phone
-
 How To2 years ago
How to Set Certain Contacts to Ring on Silent on Android
-
 How To2 years ago
How to Recover Contacts on Android Phone
-
 Tips And Trick2 years ago
New Update In Free Fire Game
-
 Android2 years ago
How to Change Read-Only Contacts on Android
-
 Tips And Trick2 years ago
Free Fire Game New Tips and Tricks
-
 How To2 years ago
How to Disable Android Automatic Updates
-
 Android2 years ago
How to Get Contacts From iCloud to Android Phone
-

 How To2 years ago
How to Uninstall Software Update On Android